
1950s Doll House Restoration Project

I’m a self-employed handyman and, like many in my line of business, Christmas/New Year is a quieter time. So when my wife Nicky (a COAM gardening volunteer) spotted an appeal in the volunteer newsletter for someone to repair a recently donated 1950s doll’s house, she suggested it would be a good project to keep me occupied until paid work built up again. The doll’s house was duly collected from the Museum and set up on the dining room table for what I was sure would only be a few days. Two things then conspired to turn this simple time filler into a five month project: firstly, four tropical storms in as many weeks led to a flood of requests for repairs to fences and shed roofs and suddenly my empty diary was full again; secondly, an initial inspection revealed that the work required to the doll’s house was more extensive than I had anticipated. This ‘blog’ is therefore to explain what’s been happening, for the benefit of those at the Museum who may have been wondering where their new exhibit had got to.

The first job was to test and repair the electrical circuits so the lights could be made to work again. After much investigation and tracing of the delicate wires, the fault was traced to the little switches installed by the original craftsman. Sadly, these therefore had to be changed. Whilst sourcing period correct replacements it seemed sensible to switch to LED bulbs. However, these are polarity sensitive and not all the bulb holders were wired the same way, so I had to switch back to ordinary bulbs rather than disturbing the old wires and risking damage to them.Originally, the lights were powered by batteries concealed in the roof void. However, opening up the roof revealed that the original battery set-up was no longer there, so the next idea was to convert the system to mains supply. This would make display easier and cheaper for the Museum. A suitable transformer was installed in the roof-space and behold the lights worked! or at least the upstairs ones did. More fiddling, advice from a BBC engineer and a bigger transformer and, at last, the downstairs lights worked too!

doll house interior of window

Doll house with window illuminated
With the lights working it was on to the windows. Three of the panes of ‘glass’ (Perspex) were missing, so a supplier was sourced that could replicate the originals in a very similar period material. Some of the wooden trim was also missing, so new sections were carved to the same dimensions and glued into place. A de-laminated plywood interior door was glued and clamped and the whole house was given a careful clean ‘Repair Shop style’ with cotton buds, water and mild detergent.

Cleaning doll house with cotton bud
Then came the problem of matching the original paint colours. Much experimentation with RAL charts and a lot of help from the local decorating centre finally arrived at near perfect matches for the three main colours, enabling the new trim to be blended in and flaking interior paint to be touched up.

Dolls house with damaged render
The next job was to stabilise the crumbling external paint. At the time that the doll’s house was built, materials were still in short supply in post-war Britain, so the structure was made from whatever was available. The walls were made from previously varnished recycled plywood. Ingeniously, this was coated in a sawdust and glue mix and painted white to replicate a lime washed pebble-dash render. Unfortunately, over time, the bond between the varnish and the sawdust glue had broken down in places.

Repairing rendor on doll's house
Large patches of ‘render’ were therefore loose or missing. A coat of diluted PVA glue was applied to the remainder to prevent further deterioration and the guinea pig’s bedding supplies were raided to provide replacement pebbledash to cover the bald patches (Don’t tell Nicky but this needed a quick spin in the food blender to make it a bit finer before it was stuck on).

Doll house with repaired render
The final task was to recreate the curtains. It was clear that there had been curtains at some stage, because curtain rails had been cleverly created by stretching springs between nails above each window, but some springs were missing and there were no curtains. At last a chance for Nicky to get involved. Some 1950s style fabric was pulled out of her extensive fabric store in our spare bedroom and the sewing machine was set up. At this point the task obviously became too daunting, so Nicky decided to break her shoulder to get out of it. This left me in charge of the sewing machine, attempting to deliver 10 pairs of something vaguely resembling curtains. Machine sewing is not one of the services I offer my customers, for reasons which would be obvious if you were to take a close look at my handiwork. However, new springs were sourced and the new ‘curtains’ were hung.
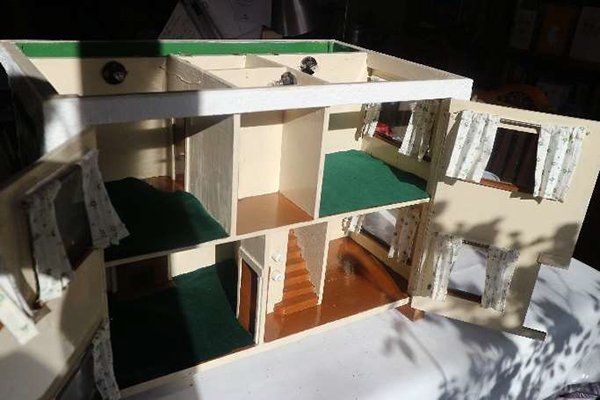
Doll house with restored interior
Finally, attempts were made to clean the original green velvet carpets, but these had been attacked by moths in the past and were in a poor state. They have been kept, but alternative carpets were fashioned from a new piece of velvet, in a colour matching as close as possible to the original.And there you have it. A five day time filler that became a five month project, involving several people to provide advice and assistance, but well worth it to preserve the fine handiwork of the original creator and enable it to be shared with new generations.
Written by Jonathan, Museum Volunteer

Outside of restored doll's house